Oauth
This article will guide through ALL the steps you need to take to, first register and use your own oauth client, second how to use your token access apps.
Oauth flow is currently being revised and will be greatly simplified in V3 (coming around fall 2018).
Register your client
The only way to formerly request a client id is through ttnctl, using the command:
ttnctl clients request myclient "My own oauth client" --uri "http://mywebsite/callback" --scope "profile,gateways,apps" --grants "authorization_code,refresh_token"
A few explanation:
--uri can be any HTTP website accessible publicly. If you don't such website you can always use "/oauth/callback/ttnctl", use with caution
--scope, the list of all available scope is available on the account server documentation.
--grants, only "authorization_code,refresh_token" is available for now.
This will send a request to the network team that will accept your client or no. You will receive an email when this is done.
Owner of private network that applied for support have to reach out to TTI directly or use ttnctl client id (no secret, /oauth/callback/ttnctl)
Use your client
This is where it get funky so buckle up ! And remember ttnctl is also the name of a oauth client.
For this section you we will use Postman to request Oauth token. We have to pass though a GUI when we first use a client but later when the obtained token expire it can be refreshed without the need of a GUI.
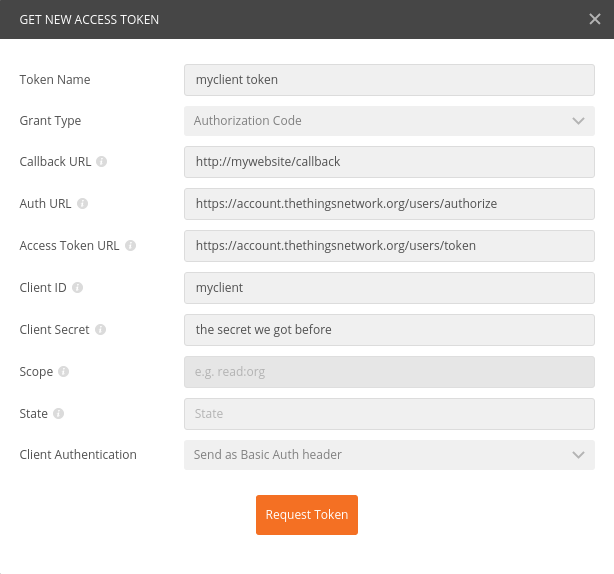
Request the first access token
Get your client secret
You client secret won't be communicated to you through any normal communication channel, security reason. You will need to use ttnctl or use the account server api.
With ttnctl
$ ttnctl clients list
  INFO Found one OAuth client:

Name           URI                     	   Secret                                 Scope                   Grants                                  Status
myclient       http://mywebsite/callback/  your_super_secret_client_secret        [profile gateways apps] [authorization_code refresh_token]      Accepted
With the HTTP API
If you already have a valid ttnctl token you can pass this (usually it is stored in "~/.ttnctl/accountthethingsnetworkorg.token").
Otherwise if you don't have ttnctl you will have to request a new token. Now, open Postman and follow this guide at the Oauth 2.0 section and instead fill the information with this:
Once you have the token, quickly send a request to the account server and obtain you client information, enter "http://account.thethingsnetwork.org/api/v2/clients/myclient" in Postamn adress bar and press "Send" :
curl -X GET \
  http://account.thethingsnetwork.org/api/v2/clients/myclient \
  -H 'Authorization: Bearer ttnctl_token'
You can copy paste curl command in Postman to import them: Top Left corner → Import → Past raw text
You will obtain all the client secret under the flied "secret"
Authorize your client
With the client secret in our hand we can authorize it. Essentially, it means initiating an Oauth2 flow, we will repeat the process describe in the section just above but this time enter those information:
If you never used postman with fo Oauth on TTN, you will have to enter your login information. You will also be asked to authorize the client and review permission. Be aware that tokens are only active for a short time, you will to do this again to request a new one.
A lot of library provide tools to autmatically refresh your token it it expired !
Done ! Now we have our first token for our client ! This token allow us to do create and list applications as well as list our gateways. Find what you can do here.
Use your client for application and devices
Our client have a token but we are lacking rights to manipulate applications and gateways. We need to obtain a another token with more specific rights for that.
Get a restricted token
For that post a request on "/users/restrict-token":
curl -X POST \
https://account.thethingsnetwork.org/users/restrict-token \
-H 'Authorization: Bearer myclient_token' `
-H 'Content-Type: application/json' \
-d '{
"scope": ["apps:apitest","gateways:mygtw"]
}'
You will obtain a token with the rights over to the application called "apitest" and the gateway 'mygtw". For the full description of the "scope" field look there.
A token can only have a maximum of 10 different scope field.
This token will be referrenced as "restrict-token" in the rest of the document.
Register an application
This time just use the restricted-token on the Application Mananger api, "/applications". This time we need to use the one on the EU handler ("eu.thethingsnetwork.org:8084")
Private network rember to refer to your own handler and domain
curl -X POST \
  http://eu.thethings.network:8084/applications \
  -H 'Authorization: Bearer restricted_token'
  -H 'Content-Type: application/json' \
  -d '{
	"app_id":"apitest"
}'
You can now register device to your application, add your friends etc.. ! See the doc for more possiblity !
Related articles